After the move to the new location the big CNC router started acting up. The problem was eventually tracked down to the Y axis lead screw acquiring a slight bend in the move. Thanks to the efforts of Dave Dalton and Luis Rodriguez (thanks guys!), the lead screw has been replaced and the router is up and churning out parts again. Luis and Nick Woods have been cutting stools for the big room:
The Mehls cut the parts for a Link cosplay sword:
And I cut out the mounts for the R3's hold down rails and the blank for its sacrificial top:
Hopefully we'll be seeing more member projects rolling off the router soon!
I've been a bit busy lately and mainly working on other people's projects, so I haven't had a lot to post lately, but I have been working on the R3 (RepRap Router) again. My laser-strap prototype has taken up residence in the new CNC room at Hamerspace and is now sporting new endstops and tool mounts including a boom for its powerful little flex shaft spindle. I got in a quick test of the tool mount and spindle last meeting and grabbed some video:
Here's some additional pics:
Next on my list of stuff I need to do for this prototype is to get the hold down system in place and mill the sacrificial top flat. I plan on embedding some extruded aluminum T-slot that works with 1/4" hex bots into the MDF work surface like the bigger CNC setup at the space and using standard woodworking hold down clamps for now and maybe design some milled or 3D printed ones as the project progresses.
Here's a sneak peek at the prototype of the laser cut version of the R3 platform with just about everything but the lead screws installed. It's based off of the OpenSCAD models for the milled R3 parts with a few modifications, primarily to use T-slot construction rather than 1/4" threaded rod. I experimented with match drilling as mentioned in the build page and it yielded some very smooth motion on every axis of travel. If all goes well, I should have my R3 prototype up and running for demos at the June 25th and 26th along with my Makerbot, PE00001, in the 3D printer village section!
I haven't gotten much done on the hardware side of things lately, but I've been busy with the electronics of the R3 platform I'm working on. Above is the first draft of the parallel port adapter that will be used for the first round of machines. This board allows a PC running Mach3, EMC2, or any other G-Code interpreter with a parallel port driver to control up to 4 RepRap/Makerbot stepper motor drivers and has separate inputs for X, Y, and Z axis home, emergency stop, and limit switches, as well as a few additional outputs and it exposes the enable functionality of the stepper motor drivers, allowing you to disable all stepper drivers if needed. I'm planning on using Mach3 for the initial prototypes and then moving to a microcontroller based G-Code interpreter (possibly based on ) once development is further along.
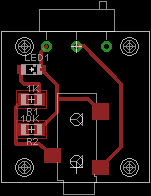
Other than the main PC breakout board, I've also designed boards for mechanical end stops (seen above) and a stepper signal splitter board (seen below) that will allow two stepper drivers to be controlled by the same signals, allowing for some interesting mechanical drive options.
While designing these boards, I tried to keep them single sided if possible, keep the required part counts low, and use big parts where applicable to make them easy to construct. The idea is to make them easy to "bootstrap" via traditional DIY PCB etching methods and easy to mill once I've got a machine up and running.


