Back near the end of October, CCCKC did a set of presentations primarily focused on 3D printing (mostly DIY 3D printing) at Hallmark in Kansas City. Here's the video from the event (I'm speaker #3 starting at about 25:00):
I wish they would have recorded the last session we did rather than the first, because it seemed rather polished in comparison by the third time we had presented (and I need all the help looking like I know what I'm doing I can get)!
Up on the MakerBot blog you can see the article running in 3D Artist magazine:
It features a picture of the local 3D printer operators group (I'm second in from the left) meeting at CCCKC. The pic was originally taken as an entry for one of MBI's challenges to see how many bot's (and their owners) we could get together for a meet up. Don't know who this David Neff guy that seems to be claiming copyright on our photo is though...
I haven't gotten much done on the hardware side of things lately, but I've been busy with the electronics of the R3 platform I'm working on. Above is the first draft of the parallel port adapter that will be used for the first round of machines. This board allows a PC running Mach3, EMC2, or any other G-Code interpreter with a parallel port driver to control up to 4 RepRap/Makerbot stepper motor drivers and has separate inputs for X, Y, and Z axis home, emergency stop, and limit switches, as well as a few additional outputs and it exposes the enable functionality of the stepper motor drivers, allowing you to disable all stepper drivers if needed. I'm planning on using Mach3 for the initial prototypes and then moving to a microcontroller based G-Code interpreter (possibly based on ) once development is further along.
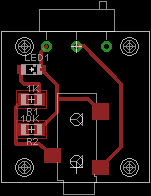
Other than the main PC breakout board, I've also designed boards for mechanical end stops (seen above) and a stepper signal splitter board (seen below) that will allow two stepper drivers to be controlled by the same signals, allowing for some interesting mechanical drive options.
While designing these boards, I tried to keep them single sided if possible, keep the required part counts low, and use big parts where applicable to make them easy to construct. The idea is to make them easy to "bootstrap" via traditional DIY PCB etching methods and easy to mill once I've got a machine up and running.
I haven't been posting any projects, but I've definitely been working on stuff! If you don't follow my Thingiverse posts, I've leaned a little about character modeling in Blender and made me a ceiling cat for the shop:
I also made some spools for jumper wire that fit in my trusty electronics tackle boxes:
I've also been working on a set of parts that'll attach to a standard Cupcake CNC to add fume hood functionality for a fellow Makerbot operator. It's not done yet, but the parts I have done make it look like a little oven, which I think is pretty awesome:
I've also been working on the CNC router at CCCKC, which has had a few successful test cuts and should help me finish a few long-running projects I've had on the back burner. Check out this for video and some more info.
Lastly, I've been working on my self replicating CNC project again. I've decided to make this project even more ambitious and I've acquired most of the hardware that I think I'll need to finish it up, or at least get it off it's feet. I'm also learning OpenSCAD and doing all my initial design and prototyping in OpenSCAD. I'm going to try and use OpenSCAD to model all the milled components in 3D and then use OpenSCAD's 2D rendering capabilities to generate the DXF files that will eventually be used to generate tool paths to actually mill the parts. I'm trying to make the design very parametric and well organized so it'll be easy for me to tweak and easy for others to modify use the parts they have on hand or make new derivatives. The CCCKCCNC being up should help prototyping as well.
One of the things that's a nice addition to any Makerbot is internal lighting. I know I've held a lamp up to my bot more than a couple times to get a better look at what was happening at the nozzle. MakerBot Industries had a lighting kit earlier on and latter added . These strips come with adhesive backing and can bee hooked directly to a 12 Volt supply for power. Unfortunately, they don't come with much in terms of instructions for use, and they're permanent nature makes them less than ideal for people constantly upgrading or modifying their bots.
Using the LED strips as a starting point, I decided to make a modular lighting solution for my Cupcake CNC that I could swap to a Thing-o-Matic if I decided to upgrade. I created a few mounting plates that I could attach sections of my strip of LEDs to that I could also wrap my wiring through and could easily be attached and removed from my bot. One plate attached to the underside of the Z-stage, and two others that are mounted at the top of the bot's build chamber. You can grab the design files and a detailed BOM for this project . I'll cover the construction of the Z-stage assembly here, as it's a little more involved than the top assemblies and works on both the Cupcake CNC and the Thing-o-Matic.
All plates are laser etched/cut from 0.06" thick sheets of PETG (kits are available with all the parts needed to assemble and mount the lights). PETG is great for this application because it's crystal clear like the acrylic the Z-stage is made out of but it's nowhere near as brittle. Below are some pics of the Z-stage plate before and after removing the protective film after laser cutting. The outlines that are etched on the plate show where the individual strips of LEDs go.
You'll need to cut four 2 inch long strips and one 4 inch long strip off of the end of your LED strip. Do not just cut these strips from anywhere in the length of the strip! The strip is actually divided up into groups of 3 LEDs in series with a small current limiting resistor in the middle. You'll need to cut the strip where one circuit ends and another begins. There will be a set of exposed copper pads clearly labeled + and - where this occurs. Cut in between these sets of pads leaving a set of exposed copper pads on each side of the cut strip (the white dashed line in the center of the picture below).
Once you've got the strips cut, get out your soldering iron and add a blob of solder to the exposed copper pads at both ends of each strip.
Next, remove the protective backing on the strips and attach them to the mounting plate. The outlines should make placement easy. Don't worry about strip orientation.
Before going much further, let's assemble the power connector. I opted for the simple solution and just used two 0.1" male headers for my power connector (This will eventually connect up to one of the 3-1/2" floppy power connectors on your ATX power supply) and some black and red 18 gauge wire twisted together with a hand drill for my power cable. If you picked up a kit from me, you'll have some nice 2 conductor Red/Black wire to wire everything up with. I removed less than 1/8" of shielding from the ends of my power wires and tinned them (applied a bit of solder) and tinned the 0.1" headers a bit too. I used 1/8" heat shrink on each conductor, and if you want to do this as well, make sure you place it on the wire before proceeding to the next step.
Next, solder the power wires to the header. If you've already applied solder the the header pins and the wire you should be able to simply touch them together and apply a little heat with the soldering iron to mate them. Do not hold the header while soldering the wires on! Also, make sure to solder the power wires to the shorter side of the header if there is one. Polarity doesn't matter at this point. It should look something like this when done:
Next shrink wrap the wires if so desired. I used a small length of 1/4" shrink wrap over the whole thing:
Now we can cut our power cable to length. I cut mine to 24 inches and had plenty of slack. Size it up on your bot if you're unsure how long you'll need to cut it to make it from your Z-stage to your power supply with a little slack for movement.
Next we need to finish up wiring the lights on the mounting plate. For this I used some nicer 2-conductor color coded red/black wire. Use the same technique of tinning the wires before mating them with the solder blobs you put down previously. If you do it right you should only have to touch each connection only briefly with your soldering iron to make the connection. Pay attention to the polarity of your connections when connecting the strips together. Positive and negative connections should be clearly labeled with + and - on the silkscreen of the strips. Positive connections go to positive and negative connections go to negative. As long as each individual strip has one positive connection and one negative connection they should light.
Next we need to connect up power. You'll notice that there are pairs of oval holes on the edges of the mounting plate. These are for power wiring. You'll want to fish the power wires in one of these paired holes and out the other:
This should help prevent damage to your lights if something accidentally yanks on the power cable. Next solder the power wires to the positive and negative pads on one of the LED strips. When you're done it should look something like this (again, if you picked up a kit you'll have red/black zip cord rather than the twisted pair pictured):
At this point you'll want to inspect your work, making sure you don't have any bridged connections or positive pads connected to negative pads. If everything checks out, it's time to test it out. Power up your bot and find a free 3-1/2" floppy power connector. If you've followed the standard wiring scheme of red being positive and black negative, you'll want to plug your header into the the power plug with yellow (+12V) matching up to red as shown below.
If everything is connected up correctly, you should see everything light up immediately:
Constriction of the two top light plates is almost exactly the same as the Z-stage plate but you'll want to adjust the length of the power wire you give each. The right top plate was relatively close to the power connector I was going to plug it into so I left it fairly short:
While I left about 2 feet of wire on the left top plate because I ran the wire for it across the front of the bot. Pay attention to where you will be running the power wires for each of these plates and make sure you don't cut their cords short!
Now the only thing left to do is attach it to your bot. The two top light plates attach easily with 2-M5x15 bolts each. I ran the wire for the left right light plate out of the hole on the back right of the bot. The right top light's power wire I ran through the M5 holes on either side of idler pulleys in the front of the bot and out the front right hole on the top of the bot:
Next you'll want to install the Z-axis plate. This plate is attached using the M5 bolts that hold your extruder to the Z-axis. Remove the bolts holding your extruder in place, slide in the plate, then re-bolt down your extruder. I added a third M5 bolt to hold the plate down that is installed just behind the extruder in one of the mounting holes that would be used to attach the pen plotter accessory. Make sure you install the bolt with the cap side down (like the rest of the extruder bolts) if you choose to install this third bolt. Lastly, check to make sure nothing is sticking down past the nozzle on your extruder so nothing can snag on your parts as they're being built!
I used some clear tape to tack down the power wires to the Z-stage and make sure they don't interfere with the operation of the machine.
That's it. Plug everything in, flip the power switch on your supply and the motherboard and proclaim "Let there be light!"
Here's some more pics with just the top lights on:


